Wednesday, 19 March 2014

How to hide databases in SQL Server Management Studio from unauthorised users?


Question:
If a user is not authorized to see a database can I exclude that database from even appearing in SQL Server Management Studio for that specified user or group?
Answer:
Until SQL Server version 2000 it was not possible to hide the database information from being displayed on SQL Server Enterprise Manager. In SQL Server 2005 it is possible with a new server side role that has been created. VIEW ANY DATABASE permission is a new, server-level permission. A login that is granted with this permission can see metadata that describes all databases, regardless of whether the login owns or can actually use a particular database. Please note By default, the VIEW ANY DATABASE permission is granted to the public role. Therefore, by default, every user that connects to an instance of SQL Server 2005 can see all databases in the instance.
An interesting point to note is that being a member of db_owner is not sufficient to see the database if “view any database” was denied. In this regard SQL Server Development team are working on new features in order to make this more affective in future releases.

How to disable database mirroring for a particular database?


Database mirroring is a primarily software solution for increasing database availability. Mirroring is implemented on a per-database basis and works only with databases that use the full recovery model.  There may be a requirement to disable database mirroring for a database that is no longer required.
To achieve this, delete the ENDPOINT for the database and there is an additional step needed to remove that particular database from Database Mirroring. To perform that execute ALTER DATABASE SET PARTNER OFF. The ::= in ALTER DATABASE statement controls mirroring for a database. Values specified with the database mirroring options apply to both copies of the database and to the database mirroring session as a whole. Only one is permitted per ALTER DATABASE statement.

Is there a difference between fill factor 0 and 100


When creating indexes in SQL Server, if you do not specify an index fill factor, the fill factor will be 0 (effectively the same as 100%). You can specify an index’s fill factor percentage in a number of different ways. Some of these methods include: The Create Index statement, DBCC DBReindex and Rebuild.
ALTER INDEX ALL ON dbo.Data
REBUILD WITH (FILLFACTOR = 90, SORT_IN_TEMPDB = ON,
STATISTICS_NORECOMPUTE = ON)
GO
DBCC DBREINDEX (Data, ”, 0)
A few caveats:

  • In the create statement you cannot specify 0 for fill factor.
  • In the DBCC DBReindex statement, if you specify the fill factor as zero, this means Reindex the index with the existing index, not 100.
  • You cannot specify 0 for the fill factor in the Rebuild statement.

SQL Server Service Accounts

While installation of SQL Server, it will install different services like

1. SQL Server

2. SQL Server Agent

3. Integration Services

4. Analysis Services

5. Browser Service Etc.,

If any service wants to interact with domain resources, network resources like file shares, linked servers, we need use domain account. Many server-to-server activities can be performed only with a domain account.

Below are the steps to create domain account and required privileges required for domain account.

1. Domain account was created by windows administrator

2. Below are rights and privileges required for domain account to access SQL Server.

a. Add domain account to Logon as Service

b. Add domain account to Replace a process-level token

c. Add domain account to Bypass traverse checking

d. Add domain account to Adjust memory quotas for a process

e. Add account to security of MSSQL Install folder and provide full control.

\MSSQL\

f. Create domain account with password never expiry. If not please change password based on the age of the password.

No Special privileges are required for Domain account.

Post Configuration of SQL Server -

1. Disable the xp_cmdshell

2. Hide the Instance from SQL Server Configuration Manager

3. Change the SQL Server Port Number from default to customize

4. Add service account to Lock Pages in Memory

5. Disable the guest account

6. Disable the Built In Administrator (for older versions)

7. Assign Min and Max Memory as per the memory in your machine.

8. Create multiple tempdb files based on the number of processors.

9. Follow the Nomenclature for DBA jobs

10. Add DBA group into Administrator

11. Enable TCP IP / Named Pipes from SQL Server configuration Manager.

12. Allow Remote Connections.

13. Enable DAC

14. Make sure alerting in place etc.,

Tuesday, 11 March 2014

How to Manage SQL Server Failover Cluster using Command Line an Overview

How to list all cluster nodes of SQL Server Failover Cluster Using Command Line (CMD)

Open Command Line and Type “cluster node” and press enter to list all the node of SQL Server Failover Cluster as shown in the snippet below. This command will list the Nodes Names, Node ID and Status of each node.
How to list all cluster nodes of SQL Server Failover Cluster Using Command Line (CMD)

How to list all Cluster Groups of SQL Server Failover Cluster Using Command Line (CMD)

Open Command Line and Type “cluster group” and press enter to list all the available resource groups of SQL Server Failover Cluster as shown in the snippet below. This command will list the Group, Node and Status of each group.
How to list all Cluster Groups of SQL Server Failover Cluster Using Command Line (CMD)

How to list all Cluster Network of SQL Server Failover Cluster Using Command Line (CMD)

Open Command Line and Type “cluster network” and press enter to list all the available networks of SQL Server Failover Cluster as shown in the snippet below. This command will list the Network Name and Status of each network.
How to list all Cluster Network of SQL Server Failover Cluster Using Command Line (CMD)


How to list all Cluster Resources of SQL Server Failover Cluster Using Command Line (CMD)

Open Command Line and Type “cluster resource” and press enter to list all the available networks of SQL Server Failover Cluster as shown in the snippet below. This command will list all the available resources.
How to list all Cluster Resources of SQL Server Failover Cluster Using Command Line (CMD)

How to Patch SQL Server 2008 Failover Cluster??…

This would be the last part of this Cluster Installation Series! In the Previous part, I’ve shown you how to Configure an Active-Passive SQL Server 20008  Failover Cluster. So at this moment our SQL Version will be at RTM, let’s apply Service pack 2 over our RTM.
Let’s begin! FYI I’ve downloaded SQL Server 2008 Service Pack 2 from microsoft and copied the exe files onto both the Nodes of our Cluster.
Procedure:
To be very simple and precise, We’ve to Install SP2 on our Passive Node(I’ve chosen Node2 as current Passive) first. Once completed, we’ve to manually failover SQL Services to Node2(Currently SQL is running on Node1) and apply patch on Node1.
This model has been introduced starting SQL 2008. Earlier SQL patching was cluster aware where it used to automatically patch all the nodes in your Cluster. But this leads to more down time depending on number of Nodes involved in your Cluster. Let us say..we’ve 8 Nodes(A-A-P) with many SQL Instances, in this case SQL Server will not be available untill all the Nodes are successfully being patched. Starting 2008 MSFT avoided this, basically making High Availability Solution more highly available ;)
Same logic applies to Active-Active Cluster as well. You’ve to Manually failover your SQL Services to other node(so at this point 2 instances of SQL will be running on single node) and you’ve to apply patch to idle node. Once patching is completed successfully on your idle node, you’ve to manually failover both the Instances to this node and patch the other node. Hope am not confusing!!
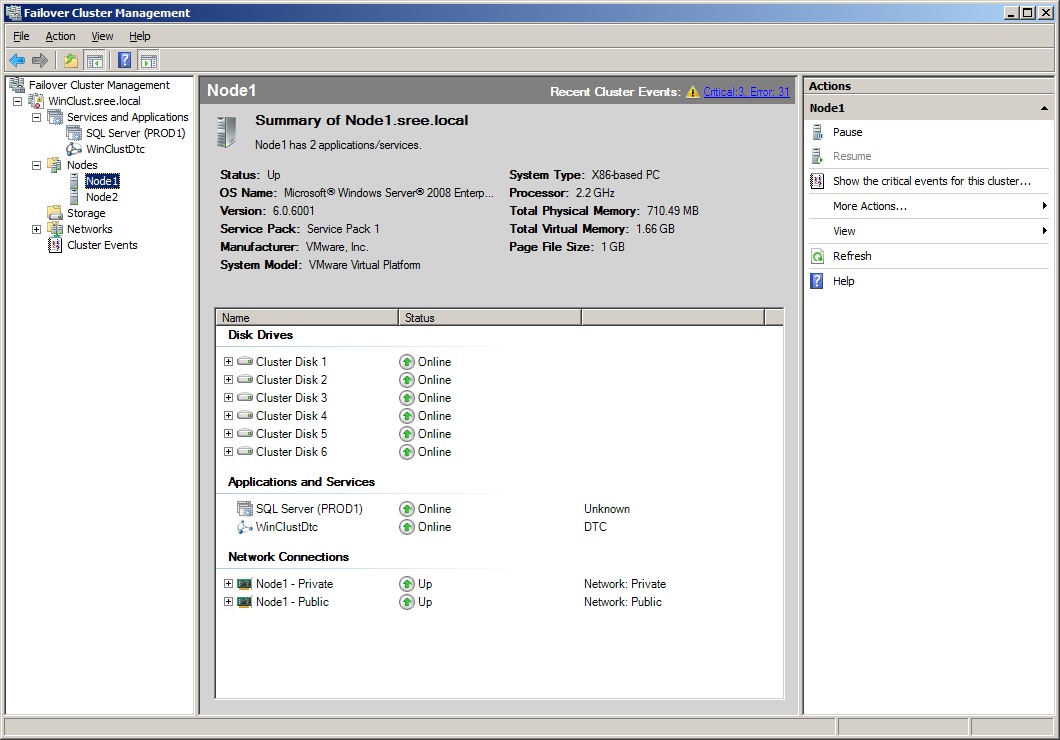
Let’s begin! I’ve chosen to patch my second node first. So I’ll make sure that SQL and all other dependencies are running on Node1. You can see below in the screenshot that Node1 is owning every SQL resource.
Very Important:  You should remove Node 2 as a possible owner through out the patching process of Node2, making sure that SQL is not going(allowed) to failover to Node2 for any reason throughout this process.
Also,Just to double check open your SQL Server Configuration manager on your Node2 and you should be seeing SQL Server and SQL Server Agent as Offline as shown below. you might be seeing Browser and FTS services as running since they are not clustered (SQL Cluster Patch installation will take care of those services as needed).
Last thing to do is open your SSMS and note your Current build and Version just by issuing @@Version. For me the current Output is
“Microsoft SQL Server 2008 (RTM) – 10.0.1600.22 (Intel X86)   Jul  9 2008 14:43:34   Copyright (c) 1988-2008 Microsoft Corporation  Enterprise Evaluation Edition on Windows NT 6.0 <X86> (Build 6001: Service Pack 1) (VM) “
Close your SSMS(if any) on Node2 and double click on the SQL Server 2008 SP2 executable, you should be welcomed with the below screen
Next ->Accept the License Terms ->Next and you’ll get the below screen where you’ve to choose the features which you want to apply patch to.
Next and It’ll perform a basic Check for any Files in Use which might prevent successful installation of SP2 as shown below.
Click Next -> Update  as shown below…That’s it:)
It will take few minutes to complete and you’ll get below screen.
Click Next->Close. Once Done, go to your Failover cluster Manager and add your Node2 back as a possible owner and Failover SQL Services to Node2(At this Point If you open your SQL Server Configuration manager on your Node1, SQL Server Service and SQL Agent Service should be Offline) and repeat the same procedure what we did for Node2, on Node1 to patch Node1 as well.
Note: Don’t forget to remove Node1 as possible owner now through out the process, making sure that SQL is not going(allowed) to failover to Node1 for any reason through out this process.
Once you are done with patching both the nodes successfully, add node1 back as possible Owner and now open your SSMS and issue @@Version and let’s compare with what we had prior to Installation.
As you see in the above screenshot we’ve upgraded our SQL from “Microsoft SQL Server 2008 (RTM) – 10.0.1600.22 (Intel X86)   Jul  9 2008 14:43:34″ to “Microsoft SQL Server 2008 (SP2) – 10.0.4000.0 (Intel X86)   Sep 16 2010 20:09:22″.
Perfect…That’s all for the day!
Basically we’ve covered everything right from scratch(Installing Virtual machines, Installing Windows Server 2008 Enterprise OS, Configure your DNS and Domain controller, Adding new Physical Computers to Domain, Creating your own ISCSI SAN, configuring NIC’s…Clustering Windows and creating SQL Server Cluster and finally how to Patch your SQL Servers which are configured as clusters).
Hope this series will be useful to someone who is new to SQL Failover Cluster setups and also hoping you enjoyed this entire series of SQL 2008 Cluster Installation as i did:)

How to Rebuild Master Database?? AKA Rebuilding SQL Server 2008R2.

Have you ever been in a situation where you lost the complete Drive where your System Databases are residing and even SAN Admins were not able to bring the Drive back?? Fortunately I’ve never been in that situation:)  What would be our available options if that disaster strikes?? In this scenario restoring System Databases won’t work because SQL Server Service itself is completely down and your System Databases mdf and ldf files are gone!!..So what should we do?? REBUILD YOUR MASTER. Rebuilding Master will actually create brand new System databases from scratch as if you just Installed your SQL Server.  There’s a misconception that we need the Actual SQL Server media and it’s mandatory to rebuild your Master. Those days are gone..That was the case with SQL Server 2005 and earlier. Starting SQL Server 2008 it’ll rebuild based upon the TEMPLATES which it creates in your BINN Directory. (This is the one of the main Reasons,you should place your SQL Binaries and actual System Databases on completely separate Physical Drives.  Let me show you what I’m talking about…..You can see the templates folder which SQL Server created while initial Installation of this Instance on my machine.
These are not the actual system database files….I repeat, these are Just templates which SQL Server will create behind the scenes during Installation Process. My actual System Databases are located in DATA folder as shown below
Note: On My laptop I Installed every thing Just on C Drive. You should never ever do this in a real environment. There’s no single valid/good reason to do so…
Once rebuild process is complete, You’ve to Restore all the User Databases from your Backups and Restore Master and Master Databases in case if you want to get back all your Logins, Jobs, Server objects etc….Yes! I agree that sounds like a very painful process….But if you’ve all your recent healthy backups and few other dependent objects…you are the champion:) So..if you don’t have a proper Backup/Restore Strategy in place…you are gone!!..You might even loose your Job for this single most important valid reason. In this post, let’s try to rebuild our entire SQL Server/Master Database.
I’ll simulate scenario by Shutting down SQL Server Services on this Instance and physically deleting the mdf and ldf files of system databases and let’s see how it looks and what are the errors you’ll be getting in this case.
Step1: Now my Data folder looks as shown below
Step 2: I tried to Start SQL Server Service from our Configuration Manager and the error messages which i’m getting are (see below Screenshots).
In the Event Viewer I’m seeing the below
Okay…! In this case we know that the issue is not with Invalid Startup Option since we deliberately deleted our Master.mdf file.
Step 3: Let’s see how to rebuild using SETUP.EXE 
As i already mentioned above we no longer need installation media to rebuild SQL Server(you can use it as well if you want to). All you need to know is where did you choose the “Setup Bootstrap/program files” while Installing your SQL Server initially. ( standardizing all these Drives, locations and paths across the Servers in your organization greatly reduces the pain to maintaining all these important details individually at Server level). In my case it’s “C:\Program Files\Microsoft SQL Server\100\Setup Bootstrap\Release” as you can see below
Step 4: Open Command Prompt(Run as Admin) and navigate to this folder where you can find SETUP.EXE and we can do the “QUIET Installation” passing the required parameters. In My case the Syntax was
setup.exe /QUIET /ACTION=REBUILDDATABASE /INSTANCENAME=DR /SQLSYSADMINACCOUNTS=”sreekanthPC\sreekanth” /SAPWD=”Pa$$w0rd”
If you want to explore all other options and parameters available to us….you can issue “setup.exe/?”  for help from windows as shown below.
In the above syntax every switch is Space Seperated. Here we are using Quiet Mode and the action is Rebuild master Database, Instance name is DR(For Default Instance: INSTANCENAME will be “MSSQLSERVER”), adding myself as a Local Admin and providing sa password(since mine is a mixed mode).
Very Very Important: Actually It failed for me and got below error Messages!!!! The error Messages were “The following is an exception stack listing the exceptions in outermost to innermost order  Inner exceptions are being indented  Exception type: Microsoft.SqlServer.Setup.Chainer.Workflow.NoopWorkflowException Message: The state of your SQL Server installation was not changed after the setup execution. Please review the summary.txt logs for further details.”  I’ve no idea what it is trying to convey here…Looks like a Bug( may be may be not) to me in SQL Server 2008R2( I’m using 2008R2 for this demo).
Work Around: I’ve selected “C:\Program Files\Microsoft SQL Server\100\Setup Bootstrap\SQLServer2008R2\Setup.exe” instead of “C:\Program Files\Microsoft SQL Server\100\Setup Bootstrap\Release\setup.exe“
Even if this doesn’t work for you, please try to make use of setup.exe from Installation media. This should work. I hope this strange behavior has been fixed in DENALI.
Sooo…..the actual Syntax and Path which worked for my case is as shown below
it took around 7-10 minutes in my case and got a command prompt without any errors as you can see in the above screenshot :)
FYI Failed path(in my case) as per Microsoft documentation  is as shown below
Please keep this Bug in your mind and don’t just PANIC if you encounter the same error message.
Well, with all this hard work…what did we achieved?? Did SQL Server Instance “DR” got rebuilt??  Yesssssssssss as you can see below, all the System database files are back.
Also..I was able to Start SQL Services from the Configuration manager and as you can see below….everything appears to be brand new…. Tadaaaaaaaaaaaaaaaaaaaaaaa!! We did it guys :) :)
 
Now it’t time to (patch if applicable) and  restore your Databases from your healthy Backups accordingly. You can see how to restore System Databases here.
That’s it Guys!!! You should be aware of this process and these challenges and work arounds as a production DBA. I would recommend to test this in your lab at least once or twice before actual disaster strikes your Production Servers…(I hope you never need this….But you should not be surprised when it hits). Hope this helps. Cheers!